
- Premiere Tutotial
How to Edit GoPro Videos in Adobe Premiere

Dec 03,2019• Proven solutions
In recent times, automatic GoPro video editing is a big thing. Importing the clips from the GoPro camera, correcting the distortion of lens based on the type of source, color correction and finally the project output needs expert software. Once you capture the GoPro footage, comes the editing part. Do you know how to edit GoPro videos in Adobe Premiere? In this article, you will learn how to import GoPro video to Adobe Premiere and edit.
Alternative to Premiere to edit GoPro video - FilmoraPro
FilmoraPro is one of the finest video editing software for the professionals. With some of the greatest features, Filmora's Pro gives wings to your imagination. Let your creativity flow and create anything and everything with this professional and advanced tool. Download it now to have a try (free)! The features of FilmoraPro are –
- Add effects to the clips at one go by grouping and labeling the clips in the timeline
- Various audio effect to use while editing GoPro videos
- Add text and titles to highlight exciting moment
- Remove background noise in a video with Audio Noise Reduction
- High-quality pre-sets and color correction features breathe life into your video
- Customize the video by adding animations, keyframes and control speed, and duration


How to Edit GoPro Video in Adobe Premiere
Step 1: Import Video
Before importing videos, the things you should consider are-
Check the camera resolution: For Standard 1080p HD video, the resolution must be 1920 x 1080 pixels. For the 4K or 2.7K videos, the resolutions are always set higher than the 1080p. Safely scale and crop the videos down to 1080p in 4K videos without compromising on the quality of the video. WVGA or 720p settings are smaller than HD videos standard 1080p setting so to achieve 1080p, scale up your video but the video appear less sharp.
Check the video frame rate to see how many frames are played within a certain time. The video appears smoother when the frame rate is on the higher side. Achieve a slow-motion effect by increasing the frame rate. If you slow down a reduced frame rate, it causes stuttering and jerky movement. 1080p at 60 fps or 2.7K at 30 fps is the best frame rate that you can use.

Once you have checked the camera resolution and the frame rate and clicked amazing shots on your GoPro tool, the primary step is to import the clips to your editing software from the camera. As soon as you import the clips, you may start to assemble the video composition. In order to import the videos connect your camera to the laptop. Open the folder where your videos are stored and drag and drop the videos into the Adobe Premiere software.
Step 2: Cut Video
Do you wish to change the timing of a certain part of a clip that is already included in the sequence? Select a clip to adjust the starting and the ending time by cutting or trimming the video. Drag the ends of the video clip as if resizing the video to shorten or extend by trimming. There is Ripple Edit tool for trimming the clips without leaving any gap or for pushing the adjacent clips in the sequence at a later date and the Rolling Edit tool for adjusting the timing of two clips between their edits. You may stop any unwanted changes by using the padlock icon on the track header.

Step 3: Fix Shaky Parts
Often used for the action sequences, in the GoPro videos there are lots of movements and shakes. This small camera is mounted on an off-road vehicle to shoot which creates vibrations in the video. In the effects menu, search for the Warp stabilization effect.
As you find it, double click on it to select and apply. It detects the motion in the video and stabilizes the clip. If you are using a handheld camera, vibrations and movement are very common. There are several distortions as well which can be removed by the prominent fish eye-effect due to the wide angle lens of the camera. It helps to create some great clips. But, it doesn’t work in every scenario. It can be corrected using one of the presets in GoPro camera. So, from effects menu, search Presets, then Lens Distortion Removal and then select the GoPro folder. You can find 3 presets and select the one that is most apt for your video.
For instance, if you have shot the video at 2.7K wide angle then select Hero 3 Black and then drag the 2.7K wide option from the drop-down menu and drop it on the clip. You can see the distortion is removed from the video.
You may also like: How to Use Warp Stabilizer in Premiere Pro Easily

Step 4: Add Audio to GoPro Video
Firstly, choose Window and then click the project to show the Project panel. The imported audio file is auto selected. To open the source the panel, double-click the file and check the waveform. If you want you may play and listen to it. To add the audio file to the clip, drag it to the sequence in the Timeline panel and drop the audio file on an audio track below the video tracks. Like you trim the video clip, similarly, you may trim the audio clip as well.
Step 5: Export Video
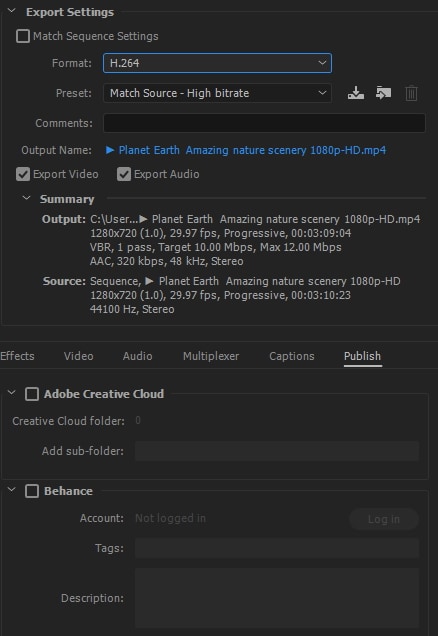
Open the sequence to export the video. To open sequence, open file, click on export and then export media. Next, on the right-hand side, you can choose the output format. For the web, you need to select H.264. Then, you may choose any preset and choose the format you wish to export. For directly exporting it to YouTube, you have to choose any YouTube preset like 720p or any other as per your requirement.
Next, select the output name and location from the video folder. Finally, click on the Export button below to export your file. You may also queue the export to manage all your exports. Click on Queue to open the GoPro Adobe Premiere and then Start Queue process all the sequences to upload on the social platforms. More information on exporting video.
Conclusion
The GoPro Adobe Premiere edits your videos and perfectly manages to remove the imperfections like jerks, vibration, and movements from the video. You get a professional looking video. Now, that you know how to edit the GoPro videos on Adobe Premiere, try your hands on shooting more often.
Bring up your video to a professional level with straightforward tools.
Try It Free Try It Free
Liza Brown
chief Editor
0 Comment(s)